Switches Part 2: Switch Assessment
In my first article in this series, Single Switches, I highlighted the role of switches in helping people with disabilities to access a range of equipment and technology. Now you understand a bit more about what switches can do, we’ll look at some hints and tips to help you through the process of a switch assessment.
The aim of a switch assessment is to determine which switch, movement and switch position is the most appropriate for the user. This involves a process of trial and error, trying a range of switches, movements and positions to determine which combination provides the most successful method of access to an activity for the user.
Before starting your switch assessment with any client, you should do some preparation so that you have all the right tools and equipment handy to meet the needs, abilities and interests of your client.
Gather some background information to determine the age of the user and their interests, and their physical, cognitive and vision/hearing impairments and skills. From there, you will need to determine some activities appropriate for their skills that can be accessed with a switch to help make your assessment successful – these should be age appropriate, meaningful, motivating and engaging for the user.
Activities for a switch assessment should have a low cognitive load – learning to use a switch is a skill in itself that takes time and practice. It is best to not introduce more complex concepts such as switch scanning, literacy and numeracy or communication when you are still trying to establish the best switching method.
 Tools of the Trade
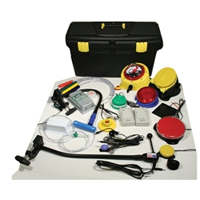
As a basic starter kit, I would recommend you have the following ready to hand to ensure a successful assessment:
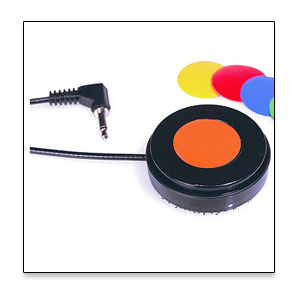
- A range of switches of different sizes and types - a good starter kit would include a Big Red Twist (large switch), Jelly Bean Twist, Buddy Button (medium size switches), Specs Switch (small), Pillow, Plate or Membrane (light touch), Lever or Ribbon, Adjustable Pressure Switch, Microlight Switch
- An adjustable switch mount such for positioning the switch on a wheelchair or desk
- Velcro and/or Dual Lock
- A tool kit with with Scissors, Screw drivers to help position switches securely for access, zip cable ties as cable tidy or attachments
- Foam wedges in various shapes and sizes to help with positioning switches and body parts
- Straps or cuffs with Velcro fastenings to help stabilise arms/legs for people with uncontrollable movement
- A laptop or tablet with a range of switch adapted games/activities
- A programmable switch interface to PC, Mac, iPad or tablet to access these
- Some switch adapted toys (if assessing a young child)
- A simple ECU device such as a PowerLink and a simple mains powered device like a lamp or fan
- A digital camera that takes both photos and video (maybe even your phone although a dedicated camera is probably preferred for privacy matters) to help review during and after your assessment, particularly if you are working on your own and can’t observe all movements and postures when the user is switching.
 Assessment
Once you have got your kit ready and worked out your activities, then you are ready to start with the assessment.
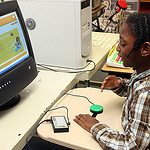
The first step should be to check the seating and positioning of the user. It is very important that there is a stable base of support for the pelvis, feet, trunk and head before starting switching. Desks with cutouts are often useful for younger children to provide support and stability for their trunk and upper limbs. If the user is in a wheelchair, then check all their straps and supports are positioned appropriately and securely and they are as upright as possible and have a stable base to allow them to then have control of their best movement for switch access.
A switch assessment should always start with determining the best movement for the user. I usually ask the client or the support person, as they can often tell you what their best movement is. If they aren’t sure, then I usually start by observing them in rest and during movement and watching their movement patterns. I often ask them to try and touch my hand in different positions with their hand, head, knee, foot etc until I can see what movement looks best for them and then choose a switch that can capture that movement.
You are looking for a movement that is controlled, accurate, reliable, repeatable (in a timely way) and efficient. You should avoid any movement that is reflexive (e.g. ATNR) or causes a reflex (e.g. extensor, startle), increases tone, or creates a lot of accessory movements of other body parts. It is often more socially acceptable to use a switch with a hand, but for some people this can be difficult.
There are a few movement patterns that usually present in similar ways:
- Athetosis – people with uncontrollable movement often benefit from the use of strapping or cuffing their upper limbs to give better distal control to allow smaller upper limb movements for switching, or trying other body parts such as head or knee.
- Dystonia – people with dystonia often find using their hands difficult for switching, and it is usually more successful with using their head or knees/feet. If they are using an upper limb, their control is often better at their end range, and they often adopt unusual postures to “fix” the body part for stability. They don’t usually tolerate strapping or cuffing of their upper limbs
- People with low tone or limited strength benefit from using smaller movements that aren’t against gravity, and it is important to consider the force and travel required to activate the switch
 When choosing a switch, consider the following features to find the best match for the movement you are trying to capture:
- Type of switch/activation method e.g. mechanical, touch, sip/puff, sensor/proximity, sound
- Sensitivity/force required for activation (some switches are adjustable)
- Travel – the distance the switch needs to move before it activates, especially important for users with limited movement
- Size - use a bigger switch for a bigger or less controlled/accurate movements
- Feedback e.g. auditory and tactile
- Durability e.g. moisture resistant if near mouth or used outdoors, heavy duty for rough users
- Safety – consider where the switch is positioned and look for any parts that could cause injury, particularly when using switches near eyes and mouth
- How the switch can be mounted or positioned for reliable and repeated access in different positions and environments e.g. wheelchair, school desk, bed etc.
A great resource to help you with the process of a switch assessment is available from the ACE Centre in the UK – it’s called the “Switch Assessment and Planning Framework for Individuals with Physical Disabilities”, you can download via the link it or at ACE's website.
source: http://acecentre.org.uk/Websites/aceoldham/images/InfoSheets/SwAssessmentFramework.pdf

Once you have established the movement/s and determined the switch/es that might be best for the user, you are then ready to start some switch trials. In my next article, I’ll talk you through this process. In the meantime, I hope this brief run through of Switch Assessment helps.


