iPad Keyguards, the Case You Use and Attachment
(Original posted by on
-- 26-05-2017
Since every Lasered Pics keyguard can be custom fit to the user’s case, we have experience with more different cases than just about anyone, and people are always asking us “Which case should I buy?”. Well, we certainly have opinions on the good and the bad of many, many cases. However, we’re not qualified to tell you what’s going to work for your end user’s situation, but we do have some opinions on general usage, and we have strong opinions on what cases work best for designing keyguards.
So with that in mind we’re going to tell you a little bit of what we’ve learned about cases in general, some of the cool ways we have of attaching keyguards to iPad cases, and then the details of some of the most often used cases and how they facilitate keyguards.
Two Types of Case
We place cases in two general categories which we call foam cases and rigid cases. We don’t have a favorite type. We think you need to determine which type of case is best for your end users. Here’s a little bit about the differences, advantages and shortcomings.
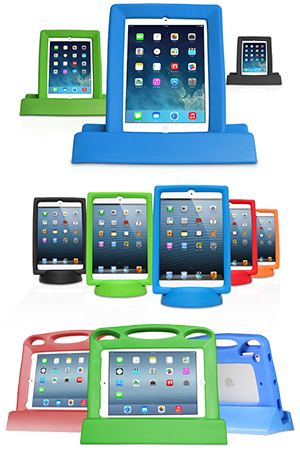 Foam Cases
Foam cases are the elastic ones with no hard shell, regardless of whether they’re made out of actual foam. Some are firm and others are spongy, but they all protect the iPad by absorbing shock with their padding, like the airbags in your car. They generally fit all around and behind the iPad and are attached by being stretched around the edges of the iPad. They usually have openings for cameras, volume buttons, etc., and are generally cut to expose the home button. Foam cases are generally the least expensive, and are sometimes not very well made, though even the saddest looking ones still provide good protection.
The stiffest foam cases require enough force to insert the iPad that you are sure you’re going to crack the screen. It helps to insert the stiffest end first, then stretch the stretchiest end last.
Foam cases don’t generally come with a screen protector, so it is usually advisable to add a “glass” screen protector before mounting the case. Some come with handles or straps, and on some of them you can drill through the handle to attach straps of your own design. Often they have a folding stand which does a fair job of propping up the iPad a ittle, and a poor job of standing it near upright.
Foam cases in general provide plenty of room for us to make strong keyguards. We like ‘em, so don’t hesitate to choose one if you will be adding a keyguard.
Rigid Cases
The next type of case is a rigid case consisting of two or more pieces that form a clamshell around the iPad. They often come with a plastic screen protector which isn’t of high quality and often responds poorly to the user’s touch. These cases are often advertised as water-resistant or even waterproof! While they are certainly great protection against saliva and accidental or intentional submersion in the bathtub, I can’t see ever intentionally submerging my iPad! Some come with a plastic jig you can insert in place of your iPad to prove to yourself that it’s actually waterproof. Still...
If you don’t need the case to be actually waterproof, you can usually remove the cheap screen protector and add a nice “glass” one. The provided screen protector is usually held with a light glue or double-sided tape and can be easily removed.
To insert an iPad into a rigid case, you need to open it. If the case is surrounded by an elastic skin, remove it by peeling it off. It’s hard to get a grip on it sometimes, so look for elastic plugs around the power jack or elsewhere that provide a good place to start. With the skin removed, you’ll see what you need to do next.
If there are screws on the back, loosen them until you can separate the two parts of the case. If there are no screws, you usually have to pry apart the plastic clamshell. Look for places you can insert a dime or a flat screwdriver and give it a careful twist. There might also be small tabs which need to be pried back to release them.
Fit the iPad to the open shell, being carefull to orient it in the right direction so the buttons and cameras line up with the case openings. Align the two parts of the clamshell carefully, then snap or screw them back together. Re-wrap it in the skin if you removed it.
Rigid cases protect by transfering the shock through the hard shell like the structure in your car protects you. They sometimes have handles or straps, and may contain stands that we find vary from excellent to totally useless. Many rigid cases give us adequate room for a keyguard, though some give us so little room that we just can’t make a keyguard as strong as we would like.
Keyguard Attachment
The way you attach a keyguard to an iPad depends entirely on the case. The critical issues are the thickness of the bezel surrounding the screen opening, and the amount of open space around the visible portion of the screen (the part with the viewable pixels). While there are commonalities among foam cases and among rigid cases, the differences are much greater in the cases from one manufacturer or another, or even among different designs from the same manufacturer.
Lets look briefly at the different types of mounting Lasered Pics offers, depending on the case. For details about specific cases, see Part Two.
Suction Cups
One of the earliest attachment keyguard methods was suction cups. A keyhole is drilled in each corner of the keyguard. The ball of the cup is inserted in the big opening and then slid into the smaller, locking it into place. Then the cups are pressed onto the screen to attach the keyguard.
 Suction cups hold tight for a long time, but they can be difficult to move if you don’t get them lined up, so always turn on the iPad and open the app before mounting them so you can be sure the keyguard is lined up. The flattened cups take up a lot of room, so they can’t be used at all on a case that has a small screen opening, and on the cases that provide minimum room, the suction cups may obscure a small portion of the screen. Fortunately, they’re clear.
On foam cases, to get enough room for suction cups we sometimes have to place them so they will extend slightly under the edge of the foam. After placing the suction cups peel back the foam a little and wiggle the keyguard so the cups spread out a little under the case, which will then help to hold the cups tight.
Suction Cup Tape
When the case provides enough of an opening, we can use suction cup tape, a black rubber tape with a strong adhesive on the back to stick on the keyguard and thousands of microscopic suction cups on the front. You can’t even see them without magnification! And the stuff works great. If you never pull it off, it sticks indefinitely, but you can remove and reattach it over and over without loas of suction.
The tape will lose its grip as it gets dirty, but it’s washable with a mild detergent like soft soap or dish soap. Just be sure you rinse it well under warm water. It takes forever to evaporate dry, so you can help it along by squeezing it hard against the glass. Every time you do that you’ll see a little amount of moisture on the screen where the tape was attached, until eventually you get it dry and it sticks like new.
Like suction cups, suction cup tape takes up room, so is unusuable on cases with small screen openings. Though it takes up less room than suction cups, it needs flat areas on the keyguard where it can be attached. It works well with more than half the cases we’ve tried.
Straps
 Straps work with every kind of case except a few of the foam cases where the thickness of the foam holds the straps too high off the screen. They attach to the right and left edges of the keyguard and stretch around the back of the case. They are a good choice if the keyguard needs to be removed and replaced often, though to swap out several different keyguards, you’re going to want a set of straps for each keyguard, since it would take too long to move the straps from one to the other.
The standard strap mounts hold the keyguard off the screen 1/8”, perfect for heavy droolers. We can also flush-mount straps so they site on or slightly above the screen.
The feedback we get is that people don’t like to use straps in a couple circumstances. First, if you use the iPad flat on a table, it can rock on the strap buckles a little. Second, if a user is prone to distraction, the straps and their attachments can provide tempting targets for fidgeters to grab.
Snap-In Attachment
Our most popular attachment, and the least expensive, is the snap-in attachment. A small flange, or ledge, is cut into the edges of the keyguard which slips under the edge of the case, holding the keyguard securely against the screen. It’s a semi-permanent installation, so it’s best for users who use a single app and don’t need to change it often. 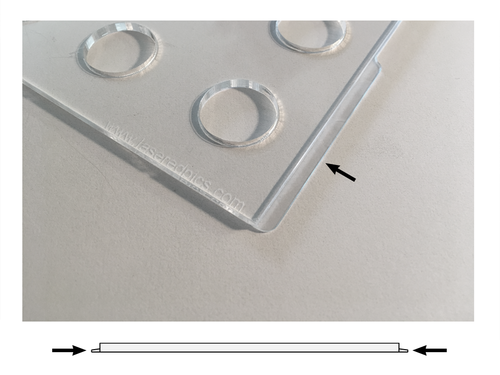 On riged cases that are secured with screws, it actually becomes a permanent installation and can only be removed by loosening the screws. Kind of yucky for a heavy drooler.
The Snap-in Attachment also requires that the seal on a case’s screen protector be broken to insert it. That means the case can no longer be waterproof however it’s easy enough to do, but you may void your case warranty - lots to consider.
This is also a great attachment for an easily distracted user, because there are no visible attachemnts with which to fiddle. The snap-in attachment works with almost every case we’ve ever tried but it does require a decision about the screen protector if one is built in.
Here's our video showing how it works
Top-Flange Velcro Attachment
The top flange attachment is an extra piece of acrylic that is bonded to the top of the keyguard and extends over the bezel of the case. It provides a flat area for mounting with Velcro, putty, mounting tape, or even thin magnets. It only works on a limited number of cases that have a wide, flat bezel surrounding the screen. If the bezel is perfectly smooth, it can even be mounted with suction cup tape. Don’t try suction cup tape on a textured bezel. It won’ t work.
Though it only works on certain cases, the top flange is the best attachment if you need to remove and reattach the keyguard often. It’s great for users of multiple apps. Unless we make it with a thicker plastic, it does hold the keyguard a bit off the screen, though.
Follow this link for Part 2 - "iPad Keyguards and Ideas of How to Attach Them To Your iPad Case" to read more about specific cases or the case you have presently.
last updated 04-07-2017
